I always tell my friends, “if you can setup a Facebook or Instagram page…you can setup a website!”
When it comes to creating a solid online presence, what many people don’t understand is that having an IG feed and a FB page as the sum total of your online presence is NOT going to cut it if you want to be taken seriously.
Bottom line…if you don’t have a website, you’re setting yourself up for failure.
I recommend WordPress as the perfect platform to build a blog or website, especially for small to mid-sized businesses. It’s really easy to set up, easy to manage and is designed to play well with Google and other mainstream tools.
I’ve setup dozens of WP websites and have trained their owners on how to run and maintain them. I’ve decided to share my tips on how to do it so here’s my step-by-step walkthrough of how to set your own WordPress site.
It’s really simple to set up and will take less than 30 minutes, I promise!
Step 1: Select a Hosting Account
Having a hosting account is the first step. A hosting account is where your website lives. Think of it as your “home address”. You’ll need a place to store all the images, text, and other files that will make up the core of your website.
While there are several hosting companies I’ve used, and have worked with in the past, I always recommend BlueHost to my clients. Why? BlueHost gives you a free domain with your purchase, plus the price point is “pocket-book friendly”; especially for a small to mid-sized business. BlueHost also has great support and a user-friendly interface.
When you’re ready to get your hosting account set up, go to Bluehost.com and click the “get started now” button (see green button above).
The next page will show the different hosting plans offered by BlueHost. Grab the basic plan to get started…it’s just $3.95/month for your domain and hosting when you choose a 3-year renewal plan (that’s about $142).
Or if you’re not ready to commit to a full 3 years, you can buy just one year for $65 ($5.45/month). You can always upgrade to a bigger and longer plan later, when your company grows and your website is getting lots of traffic.

Step 2: Choose Your Domain
Now it’s time to choose your address (your domain). Choosing your domain not only means choosing what address you’ll share with prospects and clients so they can visit you; it’ll be the name of your blog, brand, and business… so choose wisely!
If you already have a domain, that’s fine too. You’ll just enter it on the left and follow the instructions on how to use the domain as an “add-on” to your BlueHost account.
Type your desired “address” into the “new domain” box and hit “next”. A notification will pop up if the domain is unavailable, so make sure to test it out before getting too attached to a URL.
After choosing your domain name, the next step is simply to fill out your account, package, and billing information.
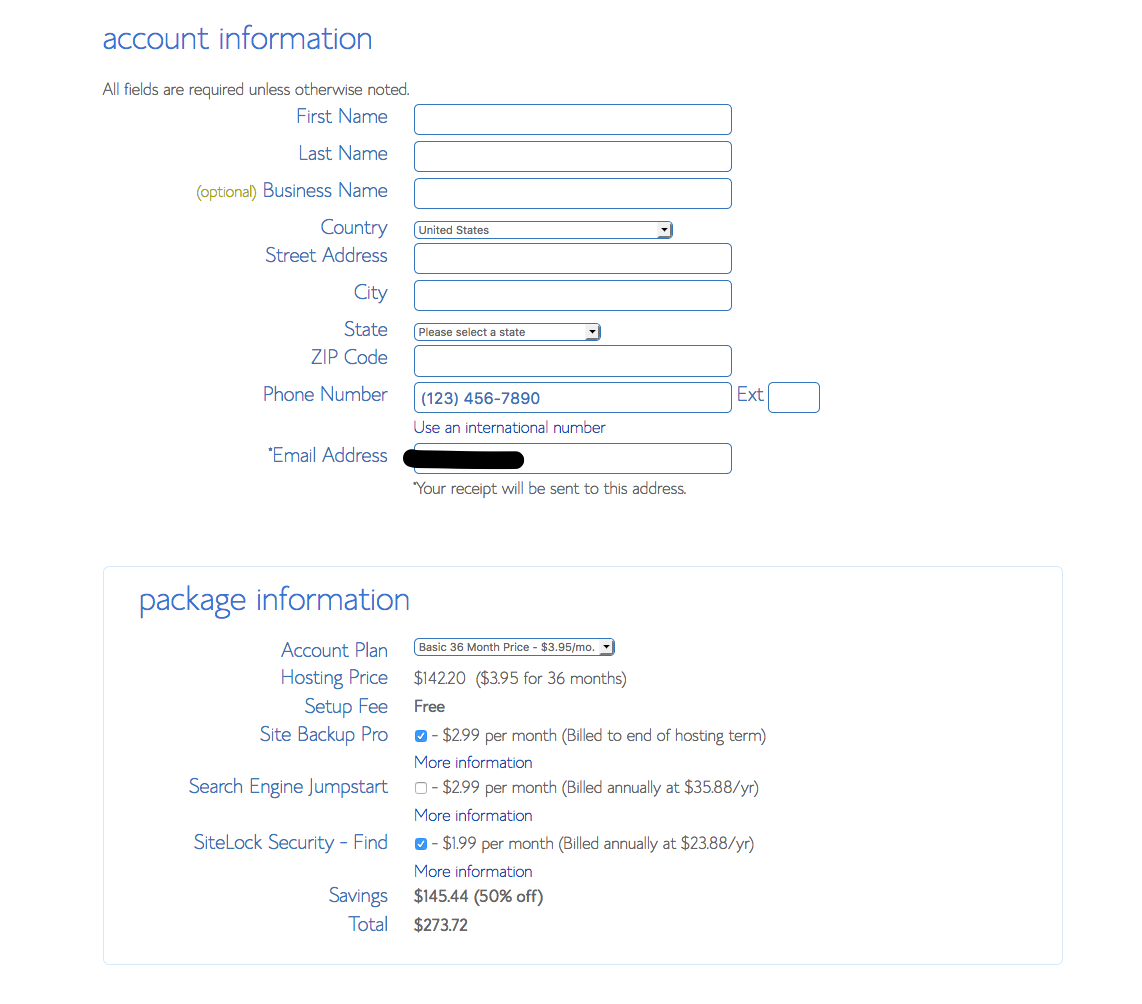
Take your time in the package section as this is where you’ll choose the length of time you want to pay for. If I were you I would choose the Domain Privacy Protection because if you don’t, you’ll get a lot of phone calls from people wanting to build your website for you. But if you’re not fazed by that, you can just leave that unchecked and tell them you’re an AMAZING web designer and that you don’t need their help.

After you’ve filled in your billing information, hit “next”. You’re already almost there!

You may come to a screen that says, “Welcome to BlueHost. Here are a few special offers for you.” Just click on “no thanks in the bottom right hand side of the image and move on.
Next you’ll choose your password
Be sure to choose a password you can remember but that also meets all of the criteria.

Once you’ve entered your chosen password again and they match, click the checkbox to acknowledge you agree to BlueHost’s Privacy Policy and Terms of Service and click Next.

Pick a theme (you can change this later if you want.) and then watch what happens next!

Step 3: Here Comes the Magic! Installing WordPress
Now the fun begins! The next few steps are designed to make things super easy for you and its really the reason why I recommend BlueHost and WordPress for self-hosted websites. I can’t emphasize my love for WordPress any more than this – believe me when I tell you it can significantly improve your online experience. I manage ALL my websites and my client’s websites with it.
After you’ve picked theme, BlueHost will begin your WordPress install. Once its done, click on Start Building to start creating your site or click on “go to my BlueHost account.” Here’s what your BlueHost dashboard will look like:

That’s it! Your site is ready for your creative touch.
If you’re not sure where to go next, you might want to consider using the Elementor plugin to build your site. Grab my Elementor Basics training and drag and drop the website of your dreams!
Happy building!


 I LOVE sharing new video trainings and free resources on my blog.